
360 DataCraft protects your Salesforce data by copying it into an AWS S3 bucket that you own. You decide what to protect, how often, and how to bring it back.
What you can do with 360 DataCraft
| CAPABILITY | IN ONE LINE | WHERE IT LIVES |
|---|---|---|
| Backup | Copy your Salesforce records to your S3 bucket, continuously or on a schedule. | Part 3 |
| Restore | Bring records, fields or whole objects back — into Salesforce, or out as a CSV file. | Part 4 |
| Archive | Move old records out of Salesforce into S3 to free storage, while keeping them restorable and searchable. | Parts 5 & 7 |
What you need before you start
- A Salesforce user
Your normal Salesforce login. It is the only credential used to sign in to 360 DataCraft — there is no separate username or password to remember. - Access to the app
A Salesforce admin gives you a role in the 360 DataCraft app (Part 1). The role controls what you can see and do. - Your AWS S3 bucket
The bucket name plus an access key ID and secret access key that can read and write to it. You will enter these once in Part 2. - A few minutes of planning
Decide which objects matter most and how fresh the copy needs to be. The “Your choice” boxes in this guide help you decide.
How to read this guide
Most screens in 360 DataCraft have several options, and you do not need all of them. To keep things simple, this guide separates what you must do from what you can choose:
| LOOK FOR IT | MEANS |
|---|---|
| REQUIRED | A step everyone completes. |
| OPTIONAL | A step you can skip without affecting the result. |
| YOUR CHOICE (blue box) | Several options, each doing something different. Read the one-liners, pick the one that fits, and carry on. |
| orange dot in a screenshot | Where to click on that screen. |
Which path should I take?
| I WANT TO… | DO THIS |
|---|---|
| Protect all my Salesforce data automatically every day | Part 3 → Entire Dataset + Scheduled Backup |
| Protect one or two business-critical objects instantly | Part 3 → Partial Dataset + Real-Time Sync Backup |
| Get back records someone deleted by mistake | Part 4 → scope Deleted-Only (or By Record for specific IDs) |
| Undo a bad data load or integration run | Part 4 → restore type Changed Between a date range, scope By Object or By Field |
| Get data out as a spreadsheet without touching Salesforce | Part 4 → destination Export Only |
| Free up Salesforce storage by moving old records | Part 5 → Archive Vault |
| Find a record I archived earlier | Part 7 → Archive Search |
PART 1
Get access
Your Salesforce admin gives people access to 360 DataCraft by assigning them a role. Once you have a role, you sign in to the portal with your usual Salesforce login.
1.1 Open the 360 DataCraft app in Salesforce
REQUIRED
In Salesforce, open the App Launcher, search for 360 and choose 360 DataCraft. The home page lists your Users and the available Roles. The tabs along the top are Home, Users, Roles, Accounts and Archive Search.
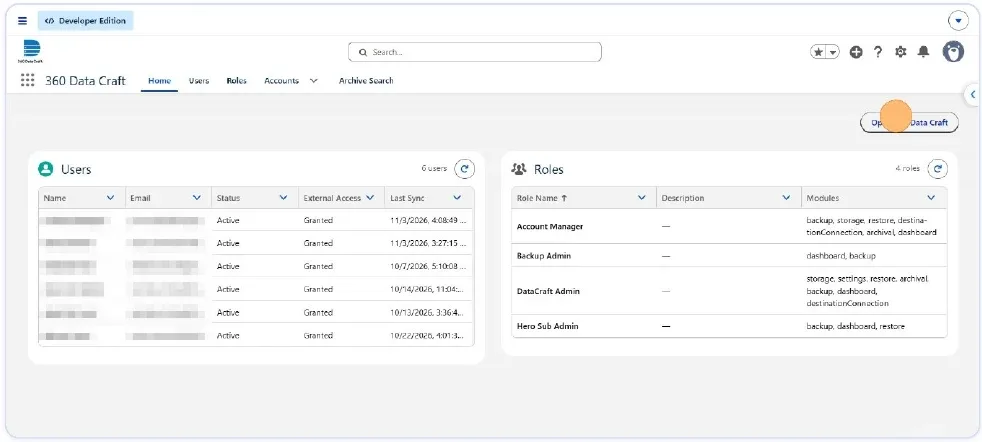
The 360 DataCraft home page. Open 360 DataCraft (top right) launches the portal.
1.2 Create the roles your team needs
REQUIRED
360 DataCraft does not come with preset roles — you define them. Open the Roles tab, click New Role, give it a clear name (for example “Backup Operator”) and an optional description, switch on the modules you want (Dashboard, Backup, Archival, Restore, Destination Connection, Storage, Settings) and tick the actions. Click Save. Create one role per kind of person, then reuse it for everyone who needs the same access.
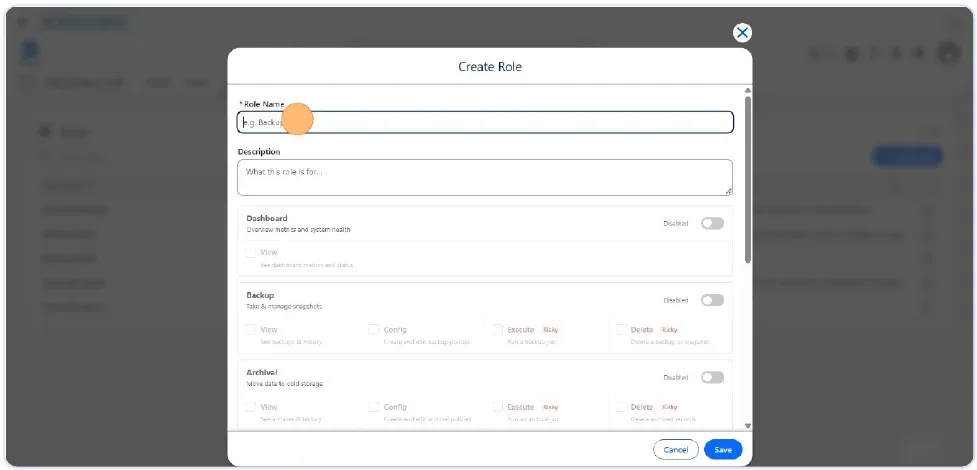
Create Role: each module has an Enabled switch and its own action checkboxes.
| ACTION | WHAT IT ALLOWS |
|---|---|
| View | See that module’s pages and history. |
| Config | Create and edit policies or connections. |
| Execute Risky | Run a backup or archive job. |
| Delete Risky | Delete backups, snapshots, archived records or destination connections. |
1.3 Give a user a role
REQUIRED
Open the Users tab and tick one or more users. In the Permissions panel click Apply Role Template, pick one of your roles, then confirm Copy permissions. The copy only fills in the draft — nothing changes until you click Save changes and see “Permissions saved”. You can use the filters (Role, Profile, Public Group) and the Users With Access / Without Access chips to find people quickly.
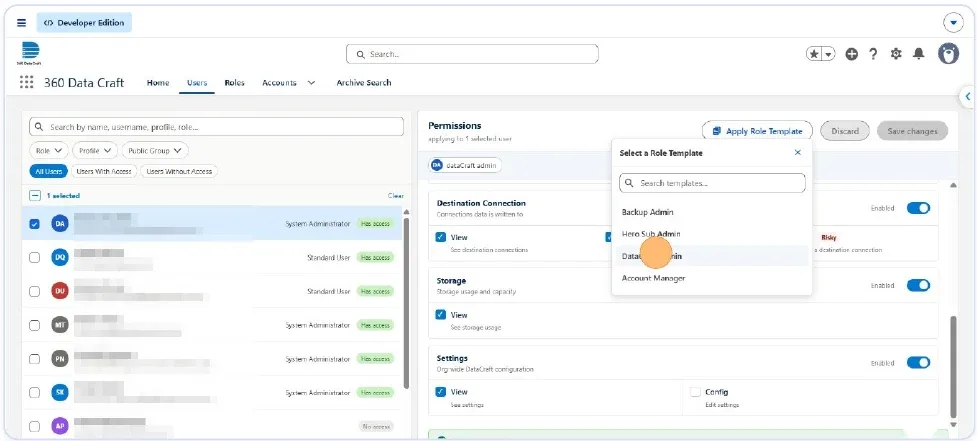
Applying a role to the selected user.
1.4 Sign in to the portal
REQUIRED
In the 360 DataCraft app click Open 360 DataCraft. On the Welcome Back page, choose where your Salesforce lives, then pick your Salesforce username (or Log In with a Different Username). You land on the Dashboard.
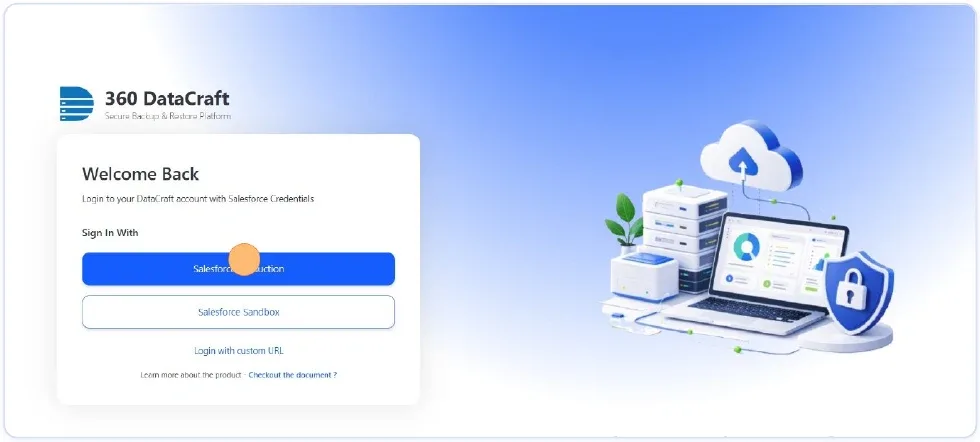
Sign in with your Salesforce credentials.
PART 2
Connect your AWS S3 bucket
360 DataCraft stores your backups and archives in a bucket in your AWS account. You connect it once, then reuse it for every backup, archive and restore.
2.1 Open Connections
REQUIRED
In the left menu choose Connections. Source Platforms shows the Salesforce orgs you have connected (each is backed up independently, with its status and connection date). Destination Platforms shows your cloud storage.
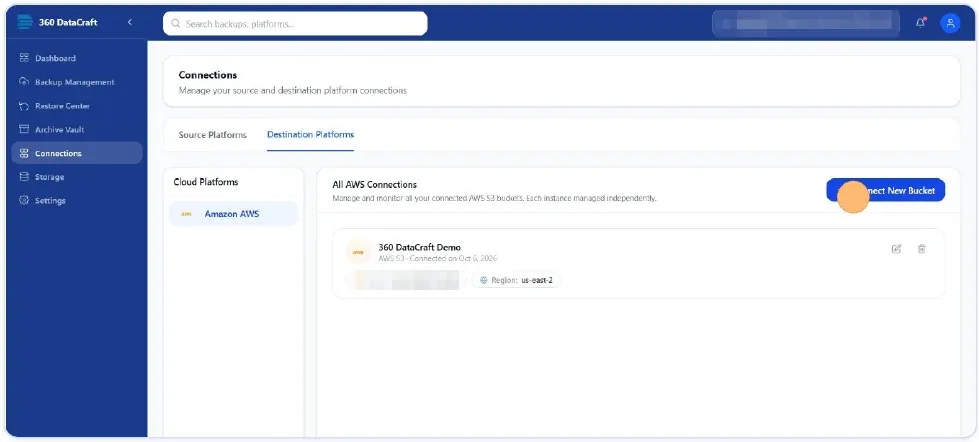
Destination Platforms → Amazon AWS. Use Connect New Bucket to add a bucket; the pencil and bin icons edit or remove one.
2.2 Enter your bucket details
REQUIRED
Click Connect New Bucket and complete the form, then click Connect.
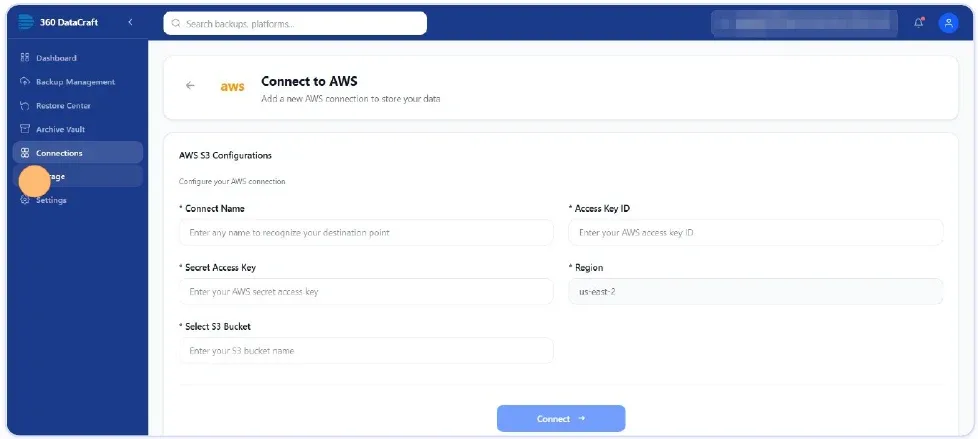
AWS S3 configuration form.
| FIELD | WHAT TO ENTER |
|---|---|
| Connect Name | Any friendly name that helps you recognise this bucket (for example “Production backups”). |
| Access Key ID | The AWS access key ID that can read and write to your bucket. |
| Secret Access Key | The matching secret access key. |
| Region | Shown by the form — make sure it matches the AWS region where your bucket lives. |
| Select S3 Bucket | The exact name of your S3 bucket. |
PART 3
Back up your data
A backup policy tells 360 DataCraft what to copy from Salesforce, where to put it, and how (continuously or on a schedule). Creating one takes six short steps.
3.1 Start a new backup
REQUIRED
From the Dashboard click + New Backup (or open Backup Management and click + New Backup). The Dashboard also gives you a quick health view — see Part 6.
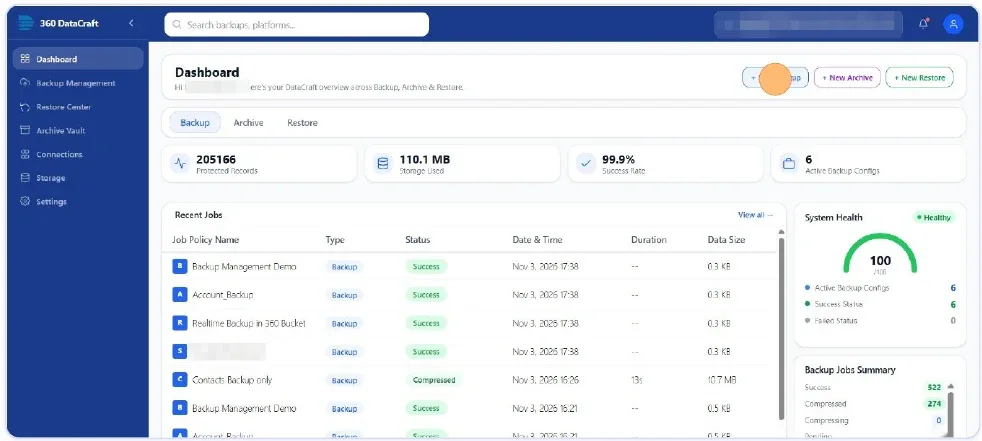
The Dashboard with the quick-action buttons for Backup, Archive and Restore.
3.2 Choose the source
REQUIRED
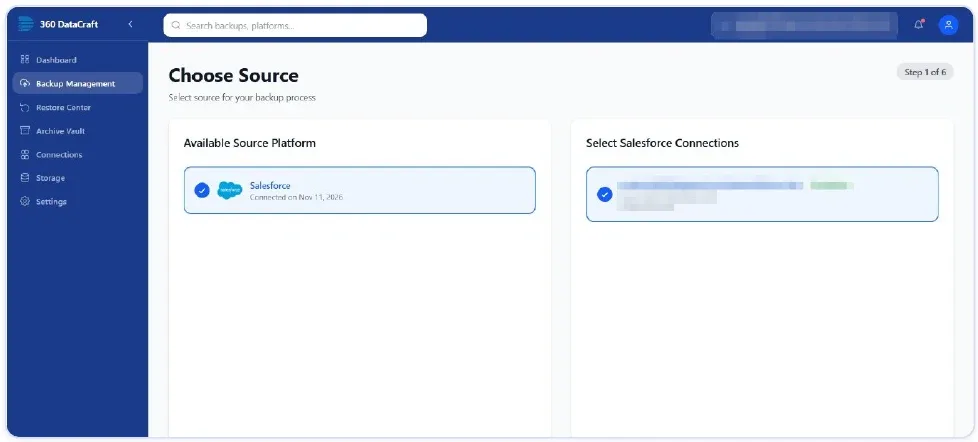
Select Salesforce and the Salesforce org you want to protect (production or sandbox). Click Select Destination.
3.3 Choose the destination
REQUIRED
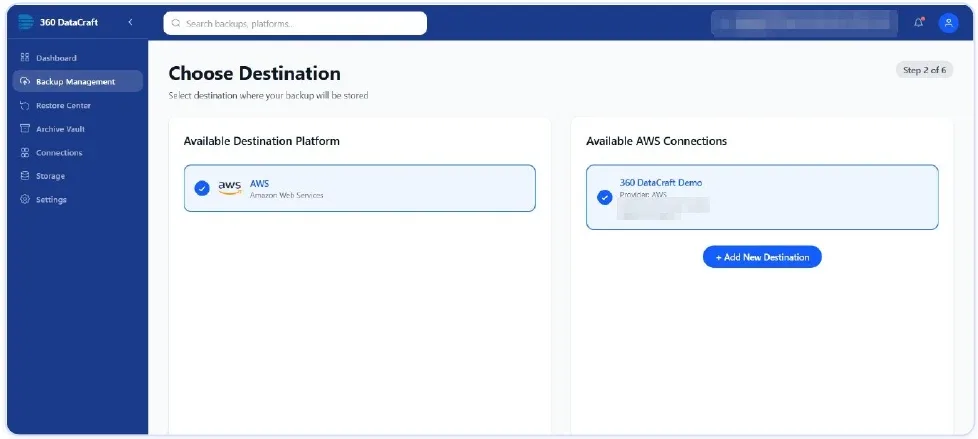
Select AWS and tick your S3 connection. Don’t see it? Click + Add New Destination (Part 2). Click Next Step.
3.4 Name the policy
REQUIRED
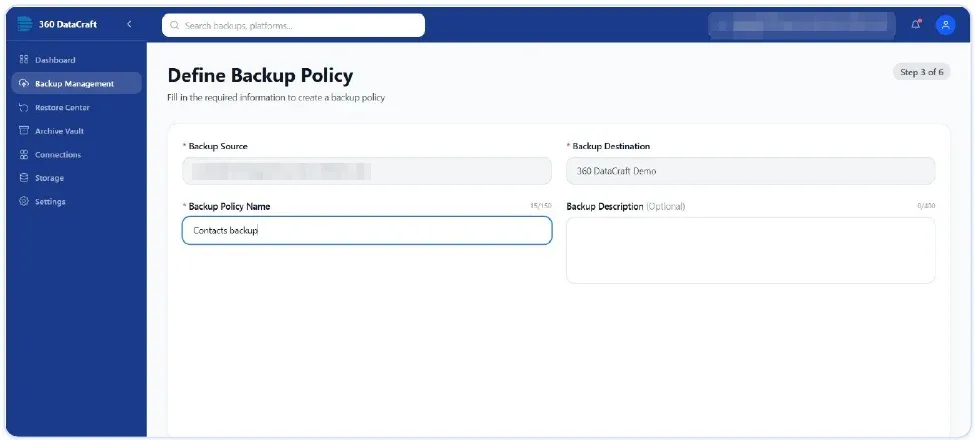
Give the backup policy a clear name (for example “Contacts backup”). The description is optional but helpful for your team. Source and destination are shown for confirmation.
3.5 Choose your backup strategy
REQUIRED
This is the most important screen. You make two independent choices: how much data to protect and how often it is protected.
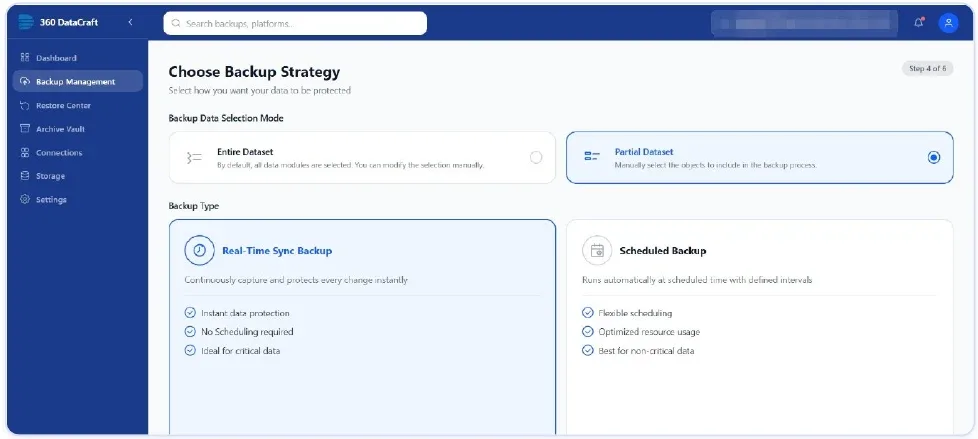
Backup Data Selection Mode (top) and Backup Type (bottom).
3.6 Pick the objects
OPTIONAL
If you chose Partial Dataset, tick the objects you want. Use the All / Custom / Standard tabs and the search box to find them; the table shows record counts and estimated size so you know what you are protecting. Tick a parent such as Account and Salesforce’s master-detail children (for example Case, Contact, Opportunity) are selected automatically — click Hierarchy next to the object to see the full tree. Clear All resets your selection.
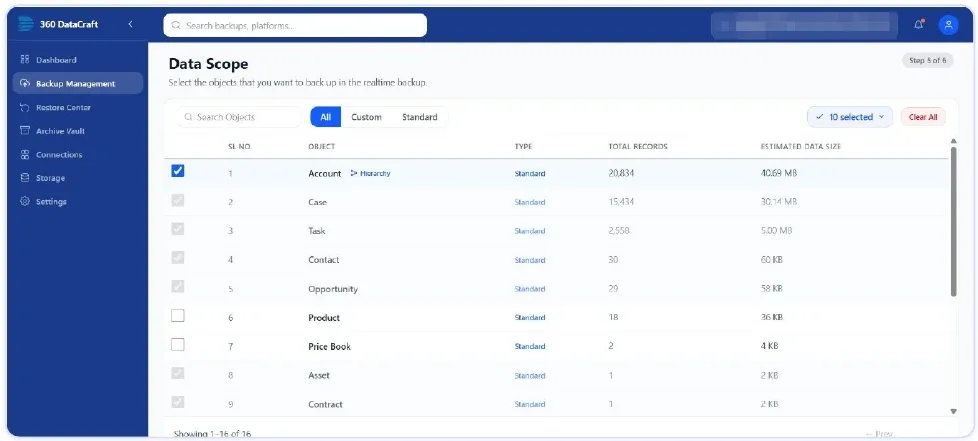
Selecting Account automatically included its related child objects (10 objects selected).
3.7 Review and run
REQUIRED
The Review & Create page summarises source, destination and strategy. Use Edit on any section to change it.
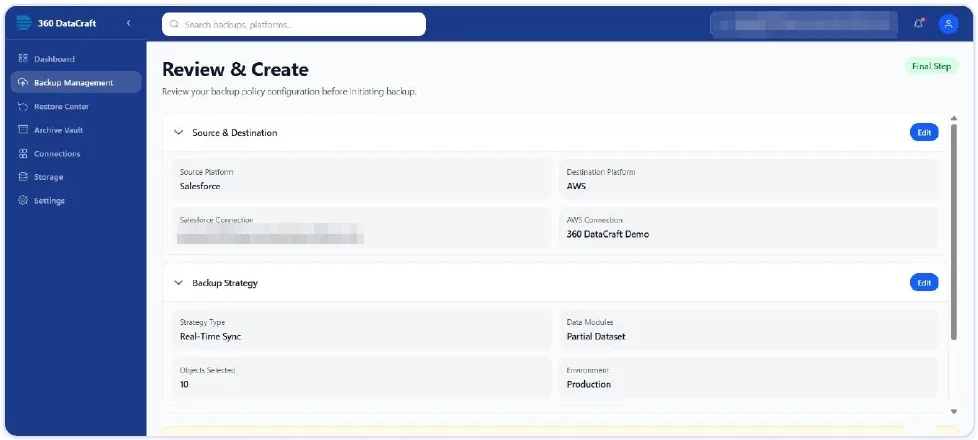
3.8 Confirm a real-time backup
REQUIRED
If you chose Real-Time Sync Backup, 360 DataCraft shows exactly what it will set up in your Salesforce org. Read it, type Accept and click Yes, Create Backup.
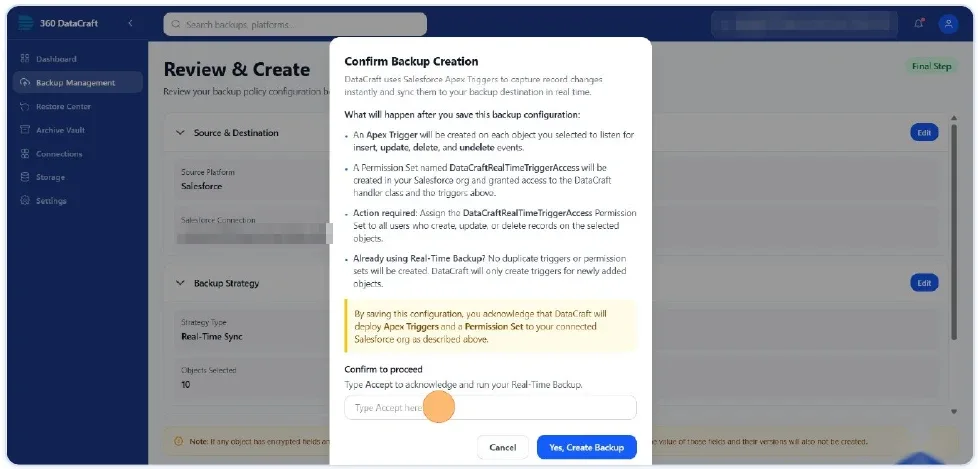
What real-time protection puts in your org.
| WHAT GETS CREATED | WHY |
|---|---|
| An Apex trigger on each selected object | Listens for inserts, updates, deletes and undeletes so changes are captured instantly. |
| A permission set named DataCraftRealTimeTriggerAccess | Gives the triggers the access they need. |
| Action required: assign that permission set | Give it to every user who creates, updates or deletes records on the selected objects. |
| Already using real-time? | No duplicates are made — only newly added objects get triggers. |
After you click Run
Your policy appears in Backup Management. The top of the page counts Completed, Running and Failed jobs and Data Processed. In the list you see each backup’s type (Realtime or Schedule), status, last job status, last run and data size. The first run is a full copy; later runs bring across only what changed.
Click a backup name to open its detail page: an Overview (status, last run, size, object count, the largest objects) and a Backup History tab. Two buttons sit at the top: Sync Schema refreshes the object and field structure from Salesforce, and Process Backup starts processing the selected backup.
PART 4
Restore your data
Restore brings data back from your S3 bucket. It works in eight guided steps, and almost every step has options — but a standard recovery needs only a few clicks. You can always preview before anything is written.
4.1 Open the Restore Center
REQUIRED
Choose Restore Center in the left menu and click + New Restore. The page also lists your earlier restores with their status and shows totals for Total Restores, Pending, Failed and Records Restored.
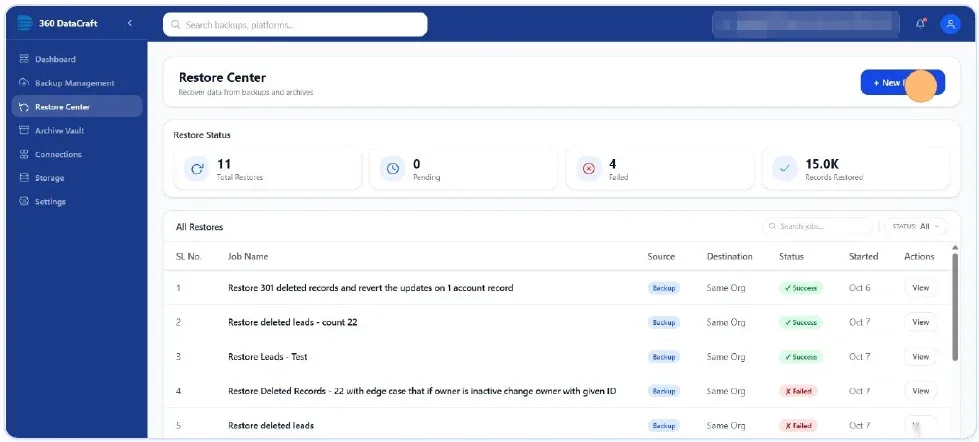
4.2 Step 1 — Source
REQUIRED
Pick AWS S3 and your connected bucket (it should show status ACTIVE), then click Next.
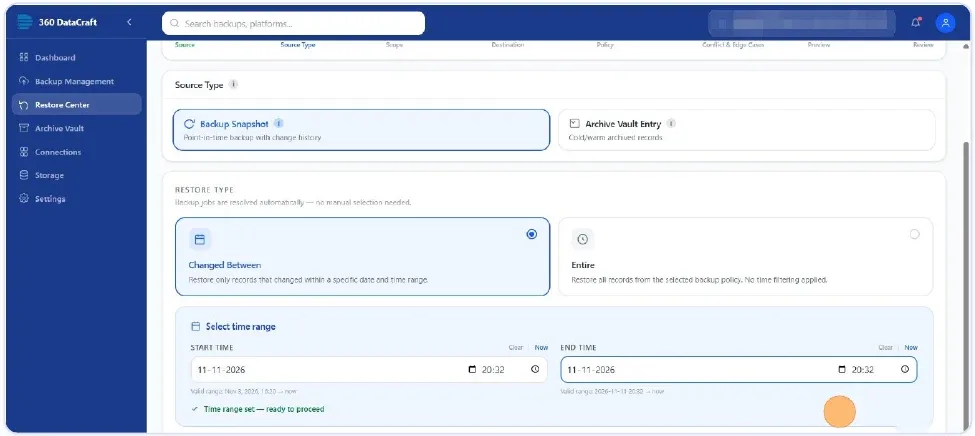
4.3 Step 2 — Source Type, backup and time range
REQUIRED
First choose what you are restoring from, then pick the backup policy, then decide how much history to bring back.
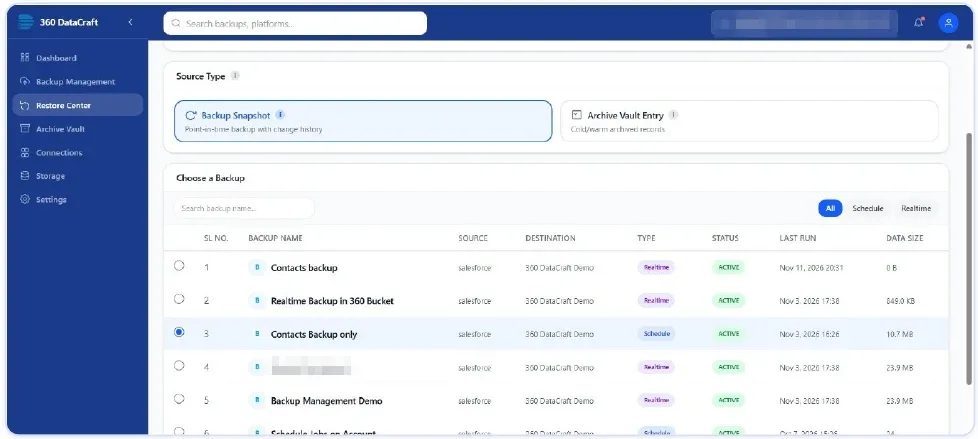
Choosing a backup from the list (filter with All / Schedule / Realtime).
4.4 Fill in the time range (Changed Between only)
OPTIONAL
Set both a Start time and an End time. The valid range is shown under each field. When both are set you will see “Time range set — ready to proceed”.
4.5 Step 3 — Scope
REQUIRED
Scope decides which data inside the backup comes back. Choose the narrowest option that does the job — it is faster and safer. Each choice reveals its own small form; the Full Restore card shows a plain-English summary of what will happen.
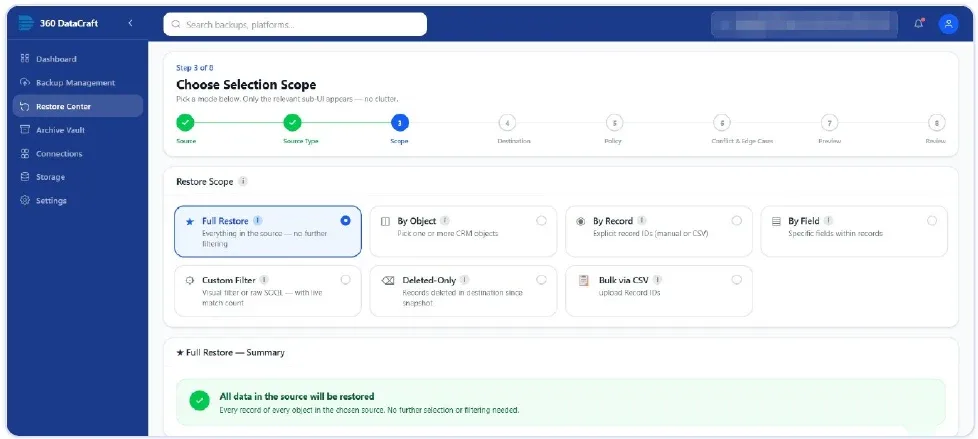
Seven ways to scope a restore.
4.6 Step 4 — Destination
REQUIRED
Choose where the restored data should go. Same-org restores need no field mapping because the structure always matches.
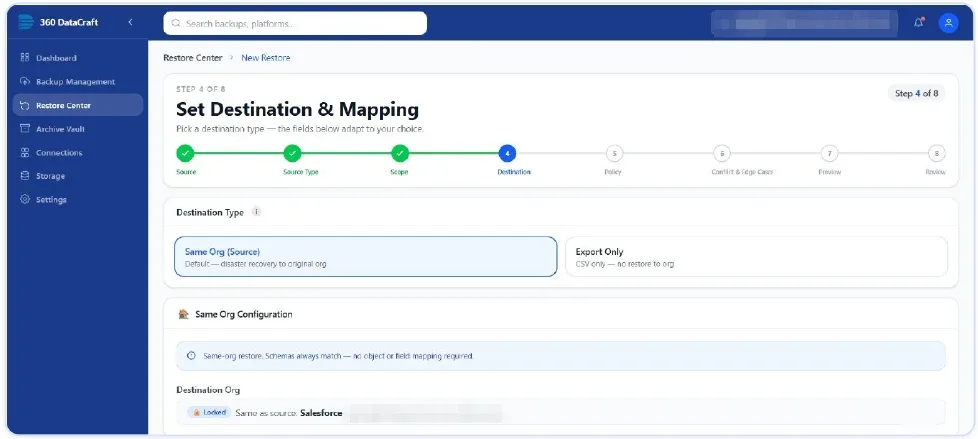
Same Org is selected; the destination org is locked to the source.
4.7 Step 5 — Policy
REQUIRED
Give the restore job a clear name (required). Adding a short description of why you are restoring — for example “Reverting accidental bulk delete of Q1 leads” — helps your audit trail.
4.8 Step 6 — Conflict handling
REQUIRED
What should happen if a record you are restoring still exists in Salesforce?
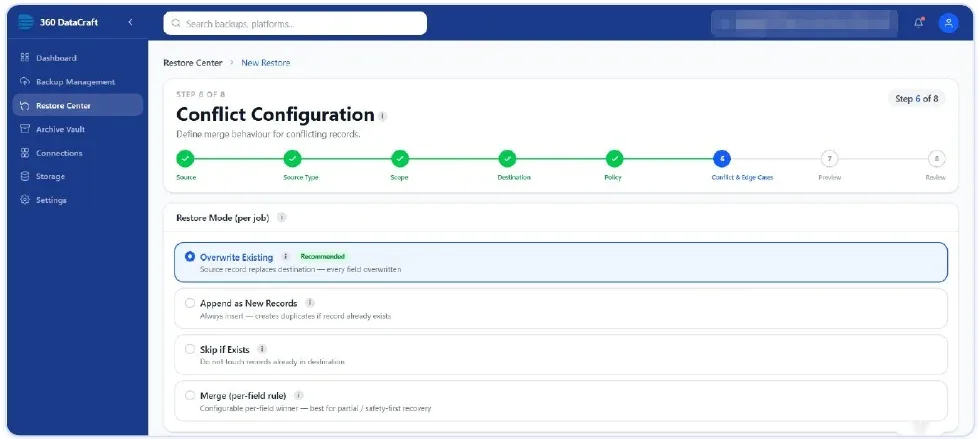
Restore Mode (per job).
4.9 Edge cases (also on Step 6)
OPTIONAL
Real data is messy — a user may have left, or a field may now be mandatory. Each situation has a drop-down so you decide in advance what happens. The defaults are safe: skip the field, skip the record, restore the parent first.
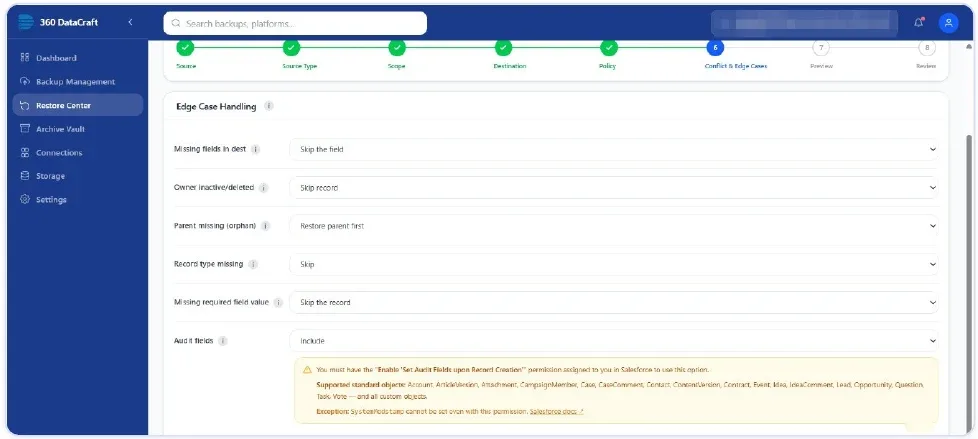
| SITUATION | DEFAULT HANDLING | IN PLAIN WORDS |
|---|---|---|
| Missing fields in destination | Skip the field | A field existed in the backup but not in Salesforce anymore. |
| Owner inactive / deleted | Skip record | The record’s owner can no longer own records. |
| Parent missing (orphan) | Restore parent first | A child record’s parent (for example an Account) is gone. |
| Record type missing | Skip | The record type no longer exists. |
| Missing required field value | Skip the record | A field has become mandatory since the backup. |
| Audit fields | Include | Keep original created/modified dates and users. Needs the Salesforce permission Set Audit Fields upon Record Creation. |
4.10 Step 7 — Preview & validate
OPTIONAL
Look before you leap. Preview shows Total changed, To update and To insert — and no data has been written yet. Large restores can take a minute, so keep the tab open.
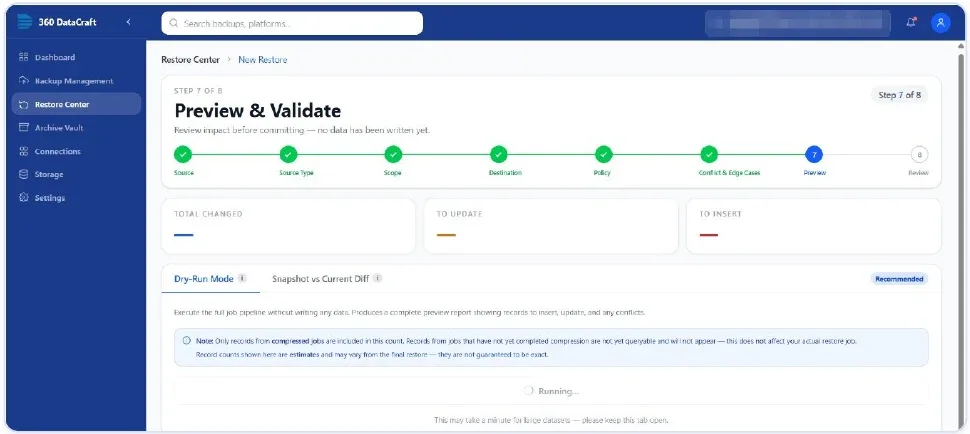
Dry run in progress. Counts are estimates and may differ slightly from the final restore.
4.11 Step 8 — Review, submit and confirm
REQUIRED
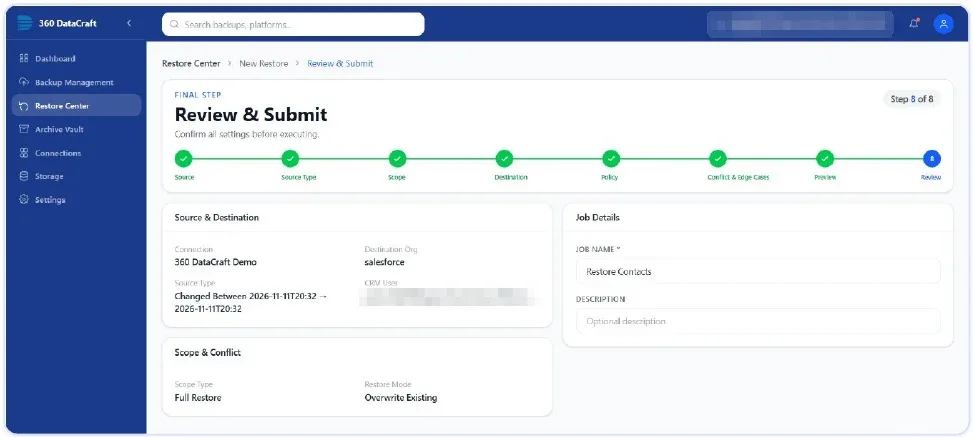
Check the summary (source, destination, scope, restore mode, job name) and click Run Restore.
4.12 Confirm the live-data warning
REQUIRED
A last dialog explains that restoring modifies live Salesforce data and cannot be automatically undone. Tick the acknowledgement, then click Confirm & Run Restore.
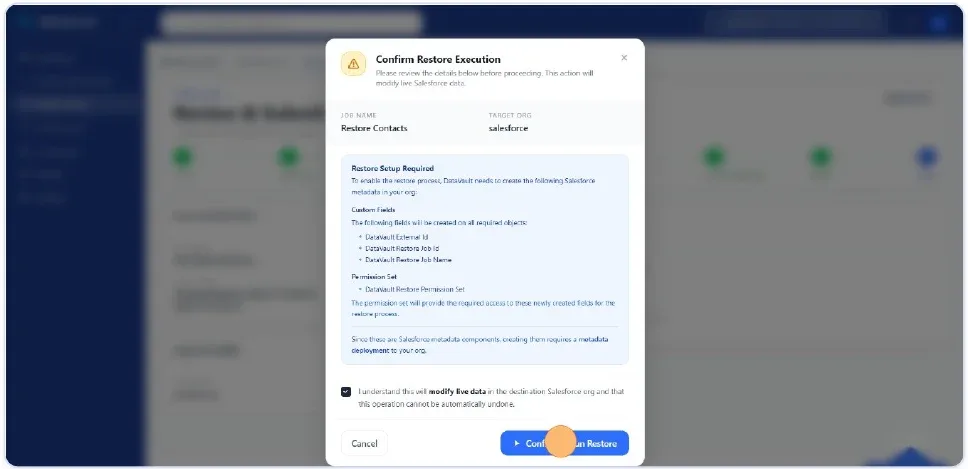
One-time setup: first-time restores create helper fields and a permission set in your org.
PART 5
Archive your data
Archiving moves older records out of Salesforce into your S3 bucket so you free up Salesforce storage. Archived records stay safe, searchable and restorable. Setting one up takes six steps.
5.1 Open the Archive Vault
REQUIRED
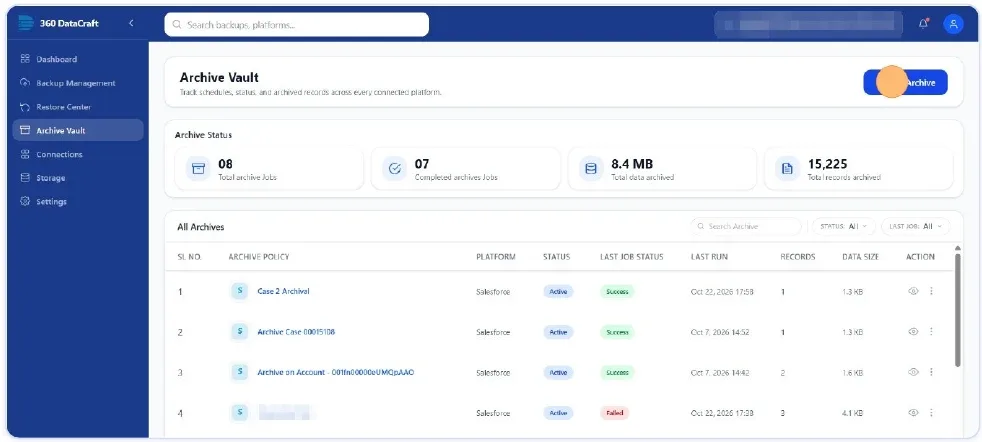
Choose Archive Vault in the left menu. Tiles show total archive jobs, completed jobs, data archived and records archived; the list shows every archive policy, its last run and result. Click + New Archive.
5.2 Choose source and destination
REQUIRED
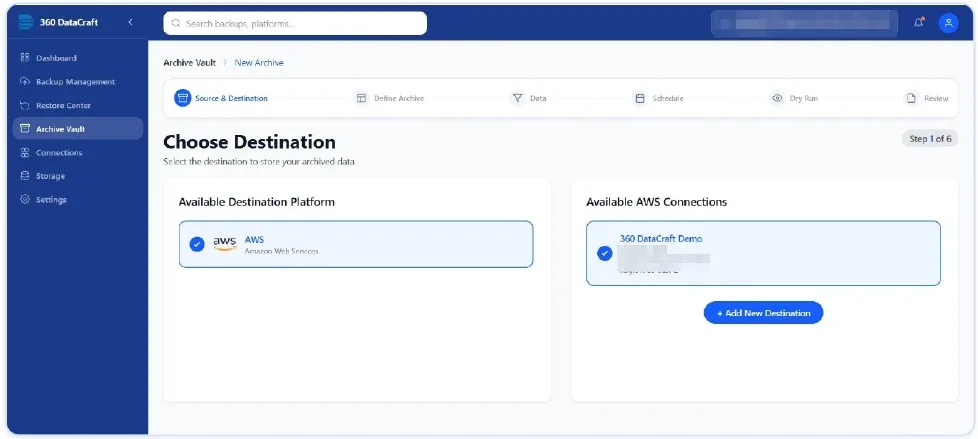
Pick your Salesforce org, click Select Destination, then choose your AWS S3 connection and click Next Step.
5.3 Name the archive policy
REQUIRED
Enter a clear policy name (for example “Archive old Cases”) and an optional description, then click Next.
5.4 Select objects and configure each one
REQUIRED
Tick each object you want to archive. Every ticked object needs a quick Set Configuration with three short parts: a filter, its children, and a schedule. When all three are set the button changes to Configuration Set.
5.5 Part 1 of 3 — Filter (which records?)
REQUIRED
Tell 360 DataCraft which records are old enough to move. Build one or more conditions (for example Last Name equals Gupta) and click Next.
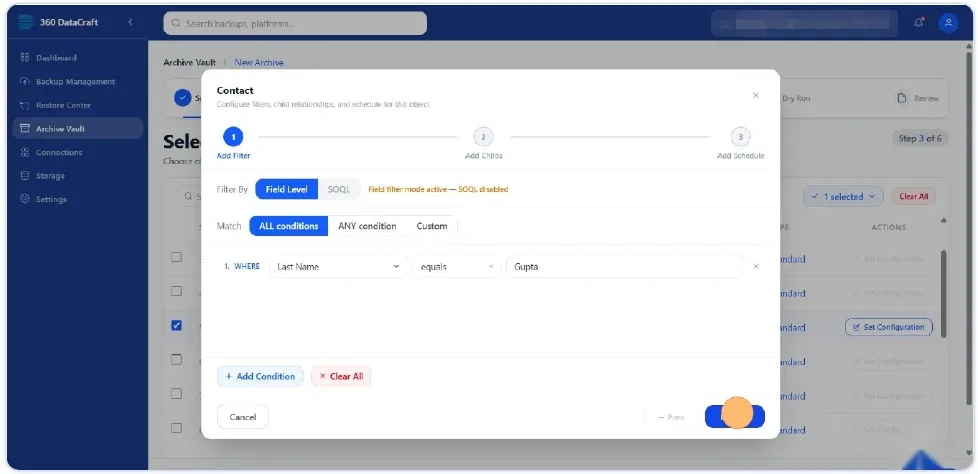
Field-level filter. Add more conditions with + Add Condition.
5.6 Part 2 of 3 — Children (what travels with them?)
REQUIRED
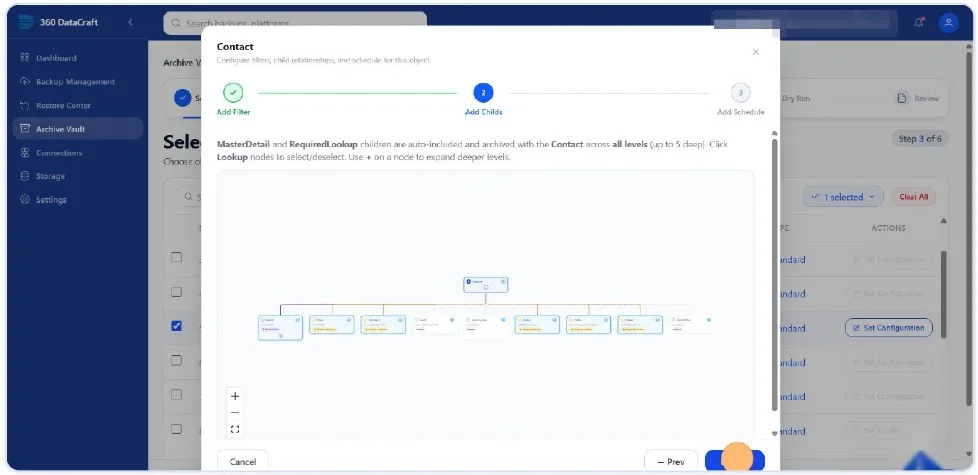
Master-detail and required-lookup children are archived together with the parent, up to five levels deep, so you never leave orphans behind. Click a node to include or exclude a Lookup child, and use + to expand deeper levels.
5.7 Part 3 of 3 — Schedule (when?)
REQUIRED
Choose whether this object follows the policy-wide schedule or has its own. Switch on Use a custom schedule for this object to override.
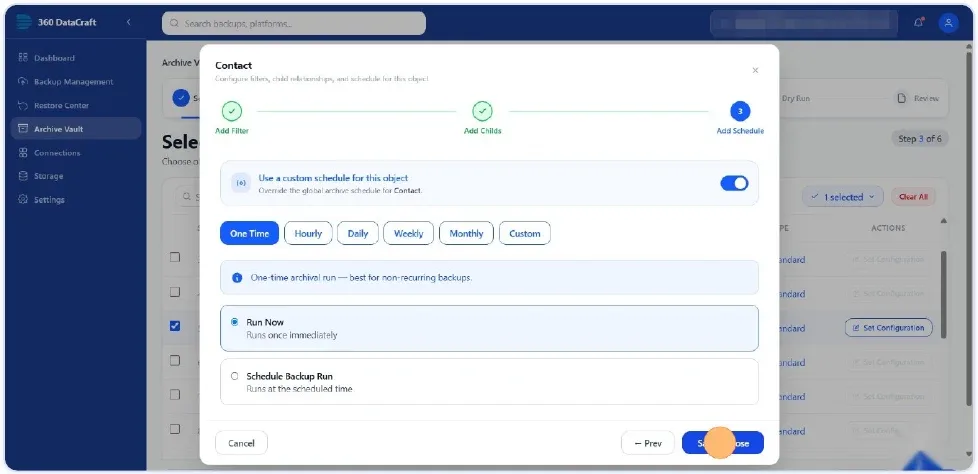
One-time archive: run immediately or at a set time.
5.8 Dry run, review and start
OPTIONAL
On the Dry Run step click Run Dry Run to simulate the archive: no records move, but you see estimated record counts and data size and can verify the filters. Then click Next to reach the final review.
5.9 Final review
REQUIRED
The review page is your last chance to change anything. It contrasts what will be removed from Salesforce with what will be stored in AWS (marked All Restorable), and lists the archive name, objects, filters and schedule. Use Edit to change a section.
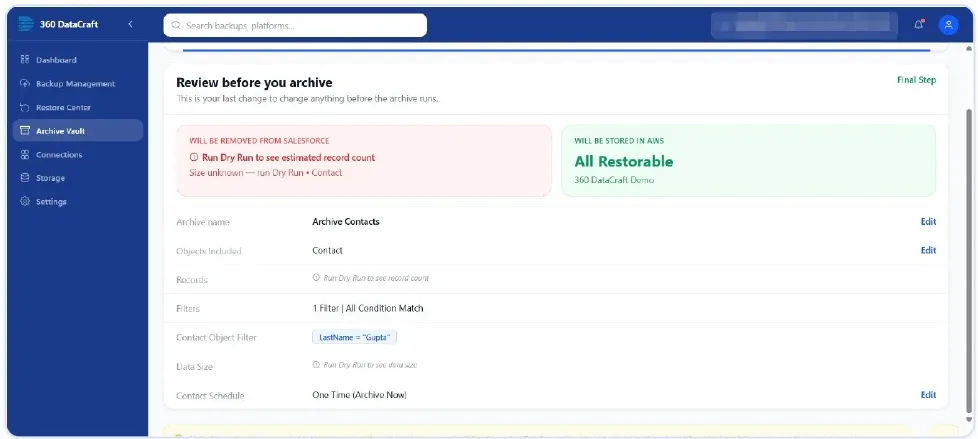
Review before you archive.
5.10 Confirm the archive
REQUIRED
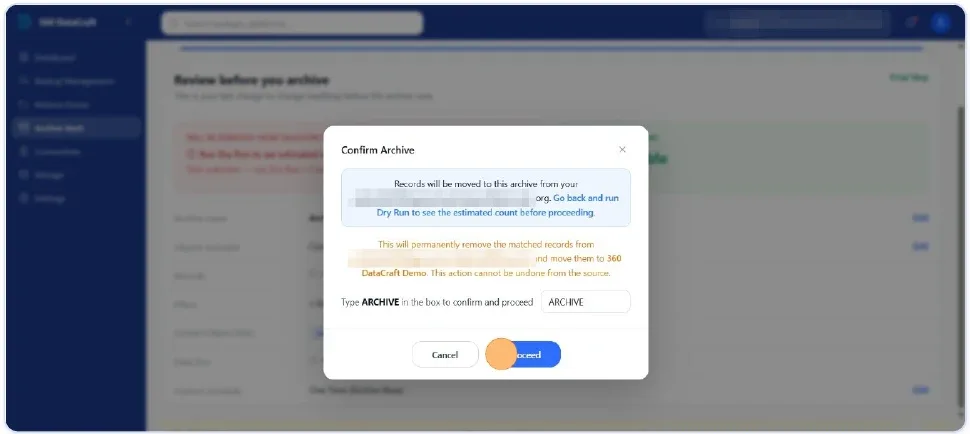
Type ARCHIVE in the box and click Proceed. The dialog reminds you that matched records are permanently removed from Salesforce and moved to your bucket, and that this cannot be undone from the source — they can be brought back later with a restore from the Archive Vault (Part 4).
PART 6
Monitor, storage and settings
Once things are running, these pages tell you how healthy your protection is and let you tune how 360 DataCraft behaves.
Dashboard
The Dashboard has three tabs — Backup, Archive and Restore — and quick-action buttons for starting each. On the Backup tab:
| YOU SEE | WHAT IT TELLS YOU |
|---|---|
| Protected Records | How many records are currently protected. |
| Storage Used | How much space your backups use in your S3 bucket. |
| Success Rate | The share of backup jobs that finished successfully. |
| Active Backup Configs | How many backup policies are active. |
| Recent Jobs | Your latest jobs with type, status, time, duration and size. |
| System Health | A score out of 100, with counts of active, successful and failed configurations. |
| Backup Jobs Summary | Job counts by outcome: Success, Compressed, Compressing, Pending, Partial Failure, Compression Failed and Failed. |
Storage
The Storage page shows how much space your backups use, by policy, and an Archive Savings section: storage used across the year and, for each archive policy, how much Salesforce storage was freed against how much DataCraft storage is used. It is a quick way to show the value of archiving.
Settings
6.1 Tune your defaults
OPTIONAL
Open Settings in the left menu. Everything here is optional — the defaults work well.
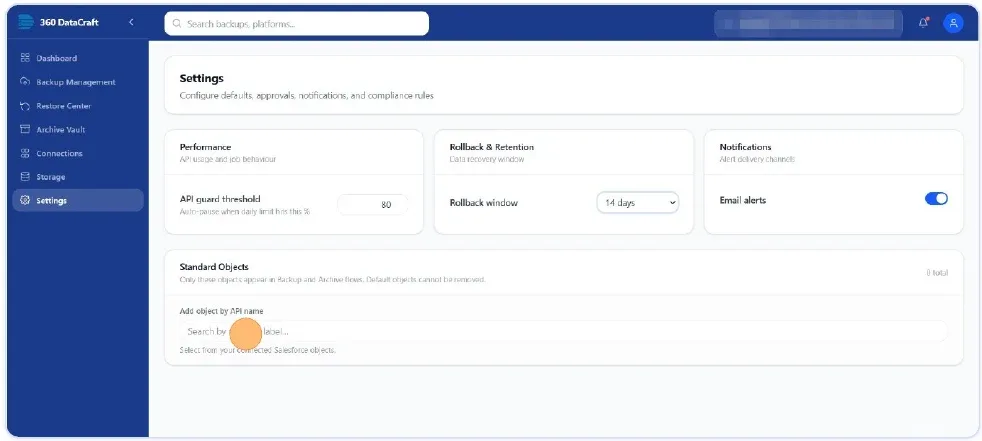
Settings: performance, rollback & retention, notifications and standard objects.
PART 7
Search archived records
Archive Search lets you look inside your archive without restoring anything. It lives in the 360 DataCraft app inside Salesforce, so you search from the place you already work.
7.1 Open Archive Search and run a search
REQUIRED
In the 360 DataCraft app, open the Archive Search tab. Choose an Object (for example Task), then narrow down with any of the options below and click Search. Results appear underneath, and the Columns button lets you choose which fields to show.
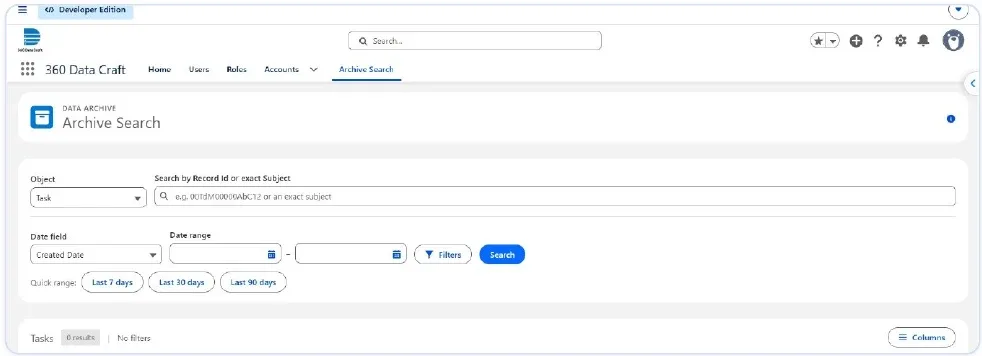
Archive Search: pick an object, then search by ID/name or by date.
PART A
Appendix: all choices at a glance
Use this page as a quick reference. Everything here is explained in detail in the parts above.
| WHERE | DECISION | OPTIONS — ONE LINE EACH |
|---|---|---|
| Access | Permissions | Apply a role = fastest · Manual toggles = tweak one person |
| Sign-in | Environment | Production = live org · Sandbox = testing · Custom URL = your company login address |
| Backup | How much | Entire Dataset = everything · Partial = only objects you pick |
| Backup | How often | Real-Time = every change instantly · Scheduled = at set intervals |
| Backup | Finish | Run Backup = start now · Save Backup Policy = start later |
| Restore | Source type | Backup Snapshot = point-in-time backups · Archive Vault Entry = archived records |
| Restore | History | Changed Between = a date/time window · Entire = whole policy |
| Restore | Scope | Full · By Object · By Record · By Field · Custom Filter · Deleted-Only · Bulk via CSV |
| Restore | Destination | Same Org = write back to Salesforce · Export Only → CSV file, nothing written |
| Restore | If record exists | Overwrite · Append as new · Skip · Merge per field |
| Restore | Preview | Dry-Run = simulate the full job · Snapshot vs Current Diff = compare values |
| Archive | Filter | Field Level = guided builder · SOQL = your own query |
| Archive | Conditions | ALL = every rule · ANY = at least one · Custom = your logic |
| Archive | Schedule | One Time (run now or later) · Hourly / Daily / Weekly / Monthly · Custom |
| Archive | Finish | Start Archive = go · Save As Draft = later |
| Settings | Tuning | API guard · Rollback window · Email alerts · Standard objects |
Before you press the big blue button
| CHECK | WHY IT MATTERS |
|---|---|
| Dry-run first | Restores and archives both offer one. It shows what will change before anything is written or moved. |
| Narrowest scope that works | A focused restore is faster, safer and easier to verify. |
| Archive moves data | Records matched by an archive are removed from Salesforce. Verify the filter. |
| Real-time needs a permission set | After creating a real-time backup, assign DataCraftRealTimeTriggerAccess to users who change the selected objects. |
| Encrypted fields | Grant View Encrypted Data if you need those values backed up. |
| Give Risky permissions sparingly | Execute and Delete can start jobs or remove data. |